Authentic Poornam Boorelu Recipe (Andhra Poornalu)
Poornam Boorelu (also known as Poornalu) is the crown jewel of Andhra and Telangana festival cooking. These golden, crispy deep-fried sweet dumplings feature a tender, cardamom-scented filling of cooked chana dal and melted jaggery wrapped inside a crisp, savory-edged urad dal and rice crust.

Making traditional poornalu at home often intimidates beginners because a single small tear in the batter can cause melted jaggery to leak and burn in the hot oil. This step-by-step recipe breaks down the exact batter consistency, dal moisture management, and oil frying techniques needed to make round, crispy boorelu that never burst.
Making traditional poornalu at home often intimidates beginners because a single small tear in the batter can cause melted jaggery to leak and burn in the hot oil. This step-by-step recipe breaks down the exact batter consistency, dal moisture management, and oil frying techniques needed to make round, crispy boorelu that never burst.
What Makes a Perfect Poornam Boorelu?
Traditional poornalu balance two distinct textures:
- The Outer Shell: Thin, crisp, and golden-brown with a mild, earthy savoriness from fermented urad dal and rice that cuts through the sweetness inside.
- The Inner Poornam: Soft, moist, and aromatic with crushed cardamom, holding its spherical shape without turning rock-hard or runny.
Ingredients You Will Need
For the Outer Batter (Tholu)
- Whole White Urad Dal (Minapappu): 1/2 cup
- Raw Rice (Biyyam / Sona Masoori): 1 cup (1:2 ratio of dal to rice ensures a crisp, non-rubbery crust)
- Salt: 1/4 tsp (essential to balance the sweet stuffing)
- Sugar or Jaggery: 1/2 tsp (helps achieve an even golden color while frying)
- Water: As needed for grinding (approximately 1/3 to 1/2 cup)
For the Sweet Filling (Poornam)
- Bengal Gram / Chana Dal (Senagapappu): 1 cup
- Jaggery (Bellam): 1 cup, powdered or grated tightly packed
- Cardamom Powder (Elachi): 1/2 tsp, freshly ground
- Ghee (Neyyi): 1 tbsp
- Water: 2.5 cups (for pressure cooking the dal)
For Frying
- Cooking Oil: Deep-frying quantity (groundnut oil or refined sunflower oil work best; add 1 tbsp of ghee to the oil for a rich festival aroma)
Ingredient Notes & Practical Substitutions
- Urad Dal to Rice Ratio (1:2): Traditional Andhra homes use 1 part urad dal to 2 parts raw rice. Using only urad dal makes the crust soft and oily like medu vada; using excess rice makes the shell uncomfortably hard once cooled. The 1:2 balance keeps the shell crisp for hours.
- Jaggery Quality: Use clean, dark-colored organic or Kolhapur jaggery for a deep caramel flavor. If your jaggery contains sand or debris, dissolve it in 3 tablespoons of warm water, strain the syrup through a fine sieve, and then combine it with the mashed dal.
- Leftover Dosa Batter Shortcut: While freshly ground batter gives the cleanest texture, you can use thick, unfermented (or very mildly fermented) regular idli-dosa batter in a pinch. If the batter feels thin, whisk in 2 tablespoons of fine rice flour or maida to bring it to a thick, coating consistency. Avoid sour batter, as the tanginess clashes with the sweet poornam.
Here is the regenerated Step-by-Step Cooking Instructions section, restructured to strictly match your existing workflow, soaking routine, wet-grinder grinding order, fennel seed inclusion, and soda-leavened batter, while delivering clear heat levels, visual cues, and failure-prevention tips:
Step-by-Step Cooking Instructions
Here is the revised, publication-ready Step-by-Step Cooking Instructions section. It aligns strictly with your original workflow (overnight separate soaking of rice and urad dal, 1-hour chana dal soak, grinding rice first in the wet grinder, adding cooking soda, sugar, and salt, melting jaggery into syrup, and infusing with cardamom and fennel seeds/saunf).
The 13 original points have been consolidated into 4 logical, easy-to-follow phases while expanding on observable sensory cues, flame levels, exact timings, and practical tips to improve SEO ranking and reader success.
Step-by-Step Cooking Instructions
Phase 1: Soak and Grind the Outer Crust Batter
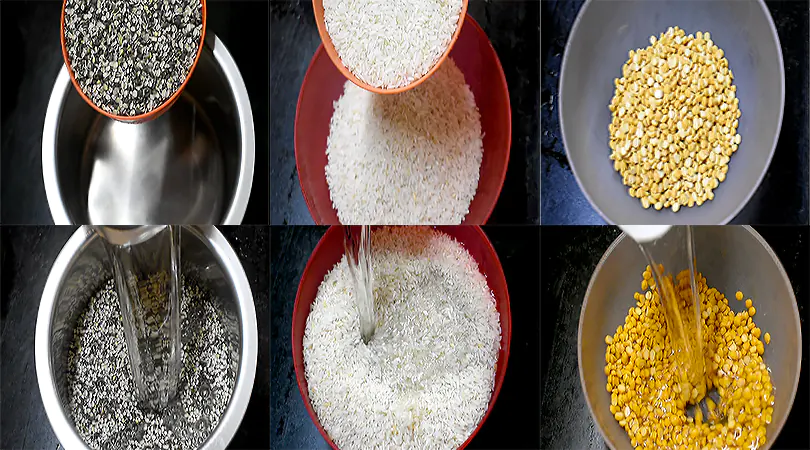
Soak the grains overnight: In separate bowls, soak the whole white urad dal and raw rice with generous amounts of water overnight (at least 6 to 8 hours) so the grains absorb moisture fully. In a third bowl, soak the chana dal for 1 hour before you begin cooking.
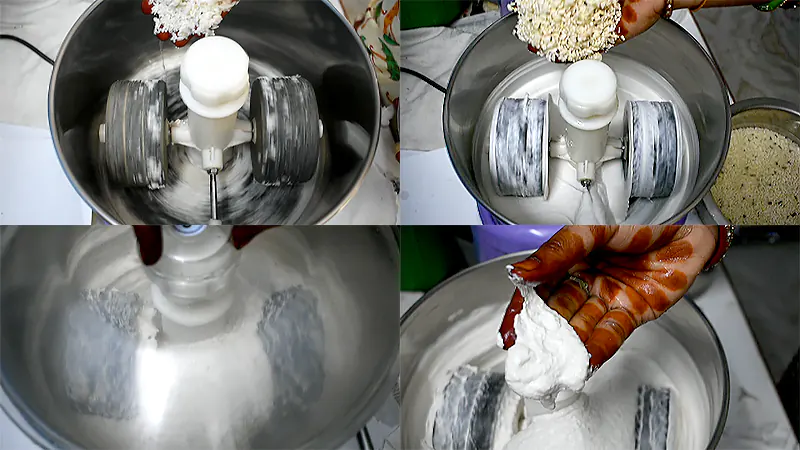
Grind the rice first: Drain the soaked rice and add it to your wet grinder (or heavy-duty mixer-grinder). Sprinkle 2 to 3 tablespoons of cold water and grind for about 5 minutes. Since raw rice has a firmer grain structure than urad dal, grinding it first ensures a fine, gritty-free base.
Add urad dal and grind smooth: Drain the urad dal and add it directly to the ground rice paste in the grinder. Grind both together, adding cold water a splash at a time, until the batter transforms into a silky, thick, and fluffy paste.
Season the portioned batter: Transfer the required portion of batter for your boorelu into a medium bowl. Stir in ½ tbsp salt, ½ tbsp sugar (for an attractive golden-brown fried hue), and a tiny pinch of cooking soda (baking soda). Whisk gently in one direction to aerate.
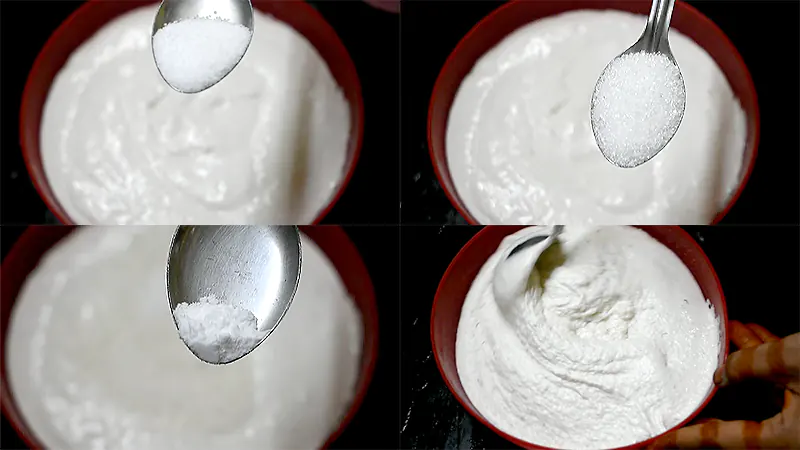
Visual Doneness Cue: The batter should be thick yet pourable—thicker than standard dosa batter, closely resembling fresh idli batter. It should cling evenly to the back of a spoon without dripping off in a watery stream.
Pro Tip / Leftover Use: Grinding in a wet grinder usually requires a slightly larger volume of dal and rice to run efficiently. Any surplus unseasoned batter can be fermented overnight and used to make crispy breakfast dosas.
Phase 2: Cook and Mash the Chana Dal
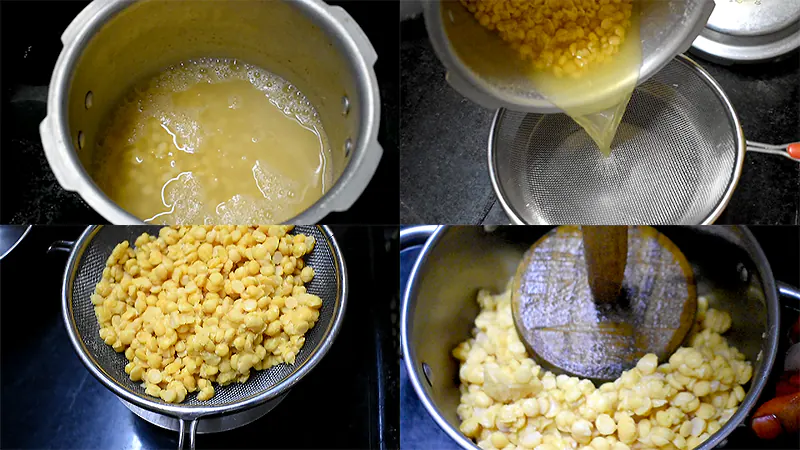
- Pressure cook the dal: Drain the soaked chana dal and transfer it to a pressure cooker along with fresh water (about 2 to 2.5 cups). Cook for 3 whistles total: 2 whistles on medium flame, followed by 1 whistle on high flame, then switch off the stove.
- Drain completely: Let the steam release naturally. Open the lid and pour the cooked dal into a colander or fine-mesh strainer. Let it sit undisturbed for 5 to 7 minutes to drain every drop of excess cooking water.
- Kitchen Note: Completely dry dal is the secret to a non-sticky filling. Reserve the nutrient-rich strained dal water to prepare a quick, tangy Kattu Saaru (Andhra-style dal rasam).
- Mash to a smooth paste: Transfer the warm, well-drained dal to a mixing bowl. Use a potato masher or the back of a sturdy ladle to mash the lentils into a smooth, pliable paste without large hard lumps. Set aside.
Phase 3: Prepare the Aromatic Sweet Poornam
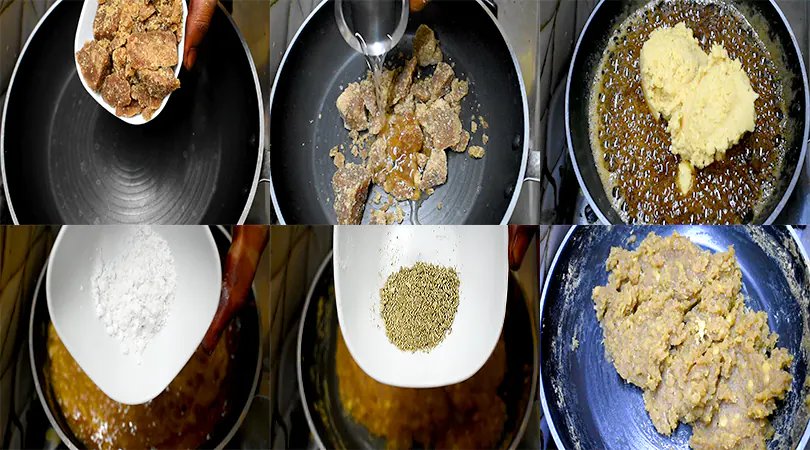
- Make the jaggery syrup: Place a heavy-bottomed pan or kadai over low-medium heat. Add 1 cup of powdered or grated jaggery along with 2 to 3 tablespoons of water. Stir until the jaggery melts completely into a bubbling, glossy syrup. If using non-organic jaggery with impurities, strain the syrup through a tea strainer and return it to the pan.
- Combine and thicken: Add the mashed chana dal paste into the bubbling syrup. Reduce the flame to low and stir continuously to prevent scorching.
- Flavor with spices: Stir in ½ tsp freshly ground cardamom powder and ½ tsp aromatic fennel seeds (saunf). The crushed fennel imparts a traditional festive depth that cuts through the intense sweetness of the jaggery.
- Cook until dense: Continue stirring over low heat for 5 to 8 minutes. The mixture will initially loosen as the jaggery heats, then steadily thicken.
- Visual Doneness Cue: The filling is done when it comes together as a unified, thick, glossy mass that pulls away cleanly from the sides of the pan. Remove from the heat and spread it onto a flat plate to cool completely to room temperature. It will firm up noticeably as it cools.
Phase 4: Shape, Coat, and Deep-Fry the Boorelu
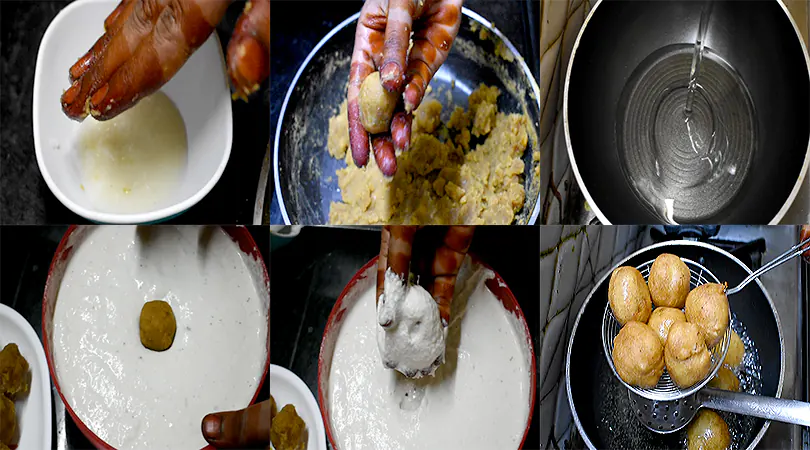
- Roll into sweet balls: Grease your palms with a few drops of pure ghee. Pinch small lemon-sized portions of the cooled sweet poornam mixture and roll them between your palms into smooth, crack-free spheres.
- Heat the oil: Heat 2 inches of cooking oil in a deep kadai over medium flame. Test the temperature by dropping a small droplet of batter into the oil; it should sink briefly and resurface within 2 seconds without burning instantly.
- Coat evenly: Drop one poornam ball into the prepared batter bowl. Gently roll it with your fingers or a soup spoon until it is encased completely in an even layer of batter, leaving no dry spots.
- Slide into hot oil: Carefully lift the coated ball and slide it into the hot oil from the side of the kadai. Fry in batches of 3 to 5 pieces at a time so the oil temperature does not drop.
- Fry until golden and crisp: Do not touch the dumplings for the first 30 to 45 seconds to allow the crust to set. Once the outer shell begins to change color and firm up, gently flip them with a slotted spoon. Deep-fry on medium flame for 2 to 3 minutes, rotating occasionally, until the crust turns evenly crisp and pale golden-brown.
- Drain and serve: Lift the boorelu out with a skimmer spoon, draining excess oil for a few seconds over the pan, and place them on a kitchen paper-lined platter. Serve hot or warm with a small drizzle of melted ghee.
Prefer a visual walkthrough? Watch our step-by-step Poornam Boorelu Recipe video on YouTube or play it directly below:
Pro-Tips for Perfect Boorelu Every Single Time
- Cool the Poornam Fully: Never roll warm poornam into balls and dip them into the batter. Warm stuffing thins out the batter on contact, creating micro-gaps that leak jaggery into the oil.
- Keep the Batter Dense: If your batter is runny, the coating will slide down the ball while you transfer it to the pan, exposing the top. Always err on the side of a slightly thicker batter.
- Control the Frying Heat: Always fry on steady medium heat. Low heat turns the shell soggy and greasy; high heat browns the outside while leaving the urad dal batter raw and sticky inside.
- Use a Fork or Spoon if Fingers Feel Tricky: If you struggle to drop the batter-coated ball into the oil cleanly with your hands without leaving finger marks, rest the ball on a tablespoon, coat it, and slide it off gently into the oil using a butter knife.
Troubleshooting Common Problems
| Problem | Root Cause | Practical Kitchen Fix |
| Boorelu burst and oil turns black | Excess moisture in poornam, or batter layer was too thin/punctured. | Return the loose poornam to the pan with 1 tbsp of roasted rice flour or roasted sooji to absorb liquid. If batter is thin, whisk in 1–2 tbsp of rice flour. |
| Shell is soft and spongy, not crisp | Batter used too much urad dal, or batter was over-fermented. | Maintain a strict 1:2 urad dal to rice ratio. Add 1 tbsp of fine dry rice flour to the batter to restore crispness. |
| Batter slides off the sweet ball | Poornam balls were warm or oily on the surface. | Chill the shaped poornam balls in the refrigerator for 15 minutes before dipping into the batter. |
| Boorelu absorb excessive oil | Oil temperature was too low when dropping the balls. | Increase the flame to medium-high for 1 minute before adding the next batch. Test with a drop of batter first. |
Authentic Variations
- Pesara Boorelu (Moong Dal Filling): Substitute chana dal with split yellow moong dal. Moong dal cooks faster and produces an ultra-smooth, melt-in-mouth filling popular in coastal Andhra regions.
- Kobbari Poornam Boorelu (Coconut & Jaggery): Add 1/2 cup of freshly grated coconut to the mashed chana dal while cooking with jaggery. This adds a sweet, nutty crunch to the core.
- Sesame-Flavored (Nuvvula Boorelu): Dry roast 2 tablespoons of white sesame seeds until fragrant and fold them into the finished poornam mixture along with the cardamom powder.

How to Serve Poornam Boorelu
Poornam Boorelu are best enjoyed hot or slightly warm. In traditional Andhra festive meals, boorelu are served at the start of the plantain leaf feast alongside savory items like Garelu (vada) and tangy Pulihora (tamarind rice).
For an authentic home-style indulgence, crack open the crispy top of a warm boore with your thumb and drizzle half a teaspoon of pure melted homemade ghee straight into the sweet center.
Storage and Reheating Guidelines
- Room Temperature: Because the filling contains cooked dal and jaggery, fresh boorelu stay fresh at room temperature for up to 2 days in an airtight container in cool weather. In hot/humid weather, consume within 24 hours.
- Refrigeration: Store leftovers in an airtight glass container in the refrigerator for up to 4 to 5 days.
- Make-Ahead Strategy: You can prepare the poornam balls up to 3 days in advance and keep them refrigerated in a covered container. Dip and fry them fresh right before serving.
- Reheating for Crispness: Never microwave cold boorelu—microwaving makes the crust rubbery and soggy. Instead, warm them in an air fryer at 160°C (320°F) for 3 to 4 minutes or reheat them on a dry, heavy tawa over low flame, turning gently until the outer shell crisps back up.
Frequently Asked Questions
Can I make poornam boorelu using readymade dosa batter?
Yes, but with precautions. Use fresh, non-sour batter. Readymade dosa batter is typically too thin for dipping, so whisk in 2 tablespoons of rice flour or all-purpose flour (maida) and a pinch of salt to thicken it until it coats the back of a spoon cleanly.
Why did my poornam become too sticky or loose to roll?
This occurs when the cooked chana dal was not drained thoroughly before combining with jaggery, or if the mixture was taken off the heat prematurely. Return the pan to low heat and cook until the steam evaporates. If it remains loose, mix in 1 to 2 tablespoons of dry-roasted rice flour or fine semolina; it will absorb the excess moisture without altering the taste.
Can I bake or air-fry poornam boorelu instead of deep-frying?
Traditional urad dal-rice wet batter requires instantaneous heat from oil immersion to seal the outer capsule; baking or air-frying wet-battered balls causes the raw batter to drip through the basket grids before setting. For an air-fryer alternative, use a dry flour dough wrap (like samosa pastry or modak dough) rather than a wet pourable batter.
Is sugar a good replacement for jaggery in poornam?
While you can technically use white sugar, authentic Andhra boorelu rely heavily on the mineral-rich, caramel depth of jaggery. Sugar makes the filling watery when heated and lacks the traditional festive flavor profile.

Authentic Andhra Poornam Boorelu (Poornalu)
Traditional Andhra festival sweet dumplings made with a tender chana dal and jaggery filling coated in a crispy urad dal and rice batter.
Ingredients
Outer Batter:
- – 1/2 cup Whole White Urad Dal Minapappu
- – 1 cup Raw Rice Sona Masoori
- – 1/4 tsp Salt
- – 1/2 tsp Jaggery or Sugar
- – 1/3 to 1/2 cup Water for grinding
Sweet Poornam Filling:
- – 1 cup Chana Dal Senagapappu
- – 1 cup Jaggery tightly packed and grated
- – 1/2 tsp Cardamom Powder
- – 1 tbsp Ghee
- – 2.5 cups Water for pressure cooking
Frying:
- – Oil for deep frying groundnut or sunflower oil
Instructions
- Wash urad dal and raw rice; soak together in water for 4 hours.
- Drain completely; grind with minimal cold water into a thick, smooth batter (thicker than regular dosa batter). Stir in 1/4 tsp salt and 1/2 tsp sugar. Rest for 2 hours.
- Pressure cook chana dal with 2.5 cups water for 4 whistles until tender but intact.
- Drain the dal thoroughly through a colander for 10 minutes (reserve water for rasam).
- Mash the dal coarsely. In a pan, heat 1 tbsp ghee, add dal and 1 cup jaggery. Cook on medium-low for 7-9 minutes until it forms a non-sticky, thick mass that leaves the sides of the pan. Stir in cardamom powder.
- Cool the mixture completely to room temperature. Grease palms with ghee and roll into 15 smooth, crack-free balls.
- Heat deep-frying oil in a kadai over medium heat until a drop of batter floats to the top in 2 seconds.
- Dip each poornam ball into the thick batter to coat evenly. Gently drop into hot oil.
- Fry over medium heat for 2-3 minutes, turning gently until golden and crisp. Drain on paper towels and serve warm with ghee.
Recipe Notes
- Batter consistency is paramount: if too thin, boorelu burst; if too thick, shells become dense and bready.
- Never dip warm poornam into batter—ensure filling is completely cooled.
- Maintain medium heat throughout frying.
Storage:
- Store at room temperature for up to 2 days, or refrigerate for up to 5 days in an airtight container. Reheat in an air fryer or on a dry tawa to regain crispness.



3 Comments